So, you got your Arduino board, installed Arduino IDE, started a new project and went: “Hold on a second?! This is not real microcontroller programming!”. Arduino C++ wrapper is great when you are taking first steps in hardware programming world, however it hides a lot of aspects of what is happening under the hood. If you are bit more advanced with programming you want to write your code in plain C and get dirty with all features of your AVR processor. Atmel Studio seems like an obvious choice for replacing Arduino IDE. This guide shows you how to configure Atmel Studio 7 to support your Arduino board on an example of Arduino Mega 2560. This tutorial assumes you are running Windows 7, you have Arduino IDE already installed on your system and that you want to program your Arduino via on-board USB port.
Stage 1: Install Atmel Studio 7
First of all, you need to download Atmel Studio from Atmel’s website. The download is free, however you need to complete registration form. Once downloaded, follow the installation wizard steps.
Stage 2: Make note of COM port being used by your Arduino board
- Plug your Arduino board to your PC via USB cable.
- Click Start, right click Computer and select Manage.
- From left-hand pane select Device Manager, expand Ports (COM & LPT) and find your board.
- Write COM port number down (in this example COM3), it will be needed soon.


Stage 3: Configure AVRdude as an external tool
- Launch Atmel Studio and once loaded, click Tools > External Tools….
- In Title text box enter an appropriate description (Arduino COM3 in this example) and click Add.
- In Command text box enter full path to AVRdude executable. This should be located in hardware\tools\avr\bin subdirectory of Arduino IDE installation directory. If you haven’t changed Arduino IDE’s default installation, the file should be located as per the below.
C:\Program Files (x86)\Arduino\hardware\tools\avr\bin\avrdude.exe
- In Arguments text box put in the following parameters and values (please note that parameters are case-sensitive):
-C<Path_to_avrdude.conf> – a path to avrdude.conf, you can find this file in Arduino IDE’s installation directory. Ensure you enter the path in quotes in case there are any spaces in your path.
-p<part number> – AVR processor model
-c<programmer type> – programmer type being used to program the board
-P<port> – COM port you should have noted in stage 2
-b<baud rate> – baud rate for the programmer
-D – disables auto erase for flash memory (required for wiring programmer used with Arduino Mega 2560)
-U<memorytype>:<operation>:<path to HEX file>:<format> – this is where you should leverage Atmel Studio’s variables to always point to freshly complied and generated HEX file. List of variables and their descriptions can be found at Atmel’s help page.Based on the above, the command in our example for Arduino Mega 2560 takes following shape (copy and paste the below and then tweak any settings as required for your board):
-C"C:\Program Files (x86)\Arduino\hardware\tools\avr\etc\avrdude.conf" -patmega2560 -cwiring -P\\.\COM3 -b115200 -D -Uflash:w:"$(ProjectDir)Debug\$(TargetName).hex":i

- I recommend deselecting all remaining options, however this is down to personal preference.
- Click OK to accept changes and close the dialogue window.

Stage 4: Create a new project and test the upload
- In Atmel Studio select File > New Project….
- From left hand pane highlight C/C++, select GCC C Executable Project and name your project accordingly.
- Ensure Create directory for solution tick box is selected and click OK.
- From Solution Explorer window open main.c file.
- Copy and paste the below code to make the on-board LED (digital pin 13) blink. The below is applicable for Arduino Mega 2560, you may need to tweak the code depending on the pin out and setup.
/* * Blink13.c * * Created: 12/11/2015 23:21:09 * Author : viper */ #define F_CPU 16000000L // Specify oscillator frequency #include <avr/io.h> #include <util/delay.h> int main(void) { DDRB = 0b10000000; // configure pin 7 of PORTB as output (digital pin 13 on the Arduino Mega2560) while(1) { PORTB = 0b10000000; // set 7th bit to HIGH _delay_ms(500); PORTB = 0b00000000; // set 7th bit to LOW _delay_ms(500); } } - Compile your project by selecting Build > Build Solution (or by simply pressing F7).
- Check Output window at the bottom and ensure the project has compiled successfully.
Build succeeded.
========== Build: 1 succeeded or up-to-date, 0 failed, 0 skipped ==========
- Program your board by selecting Tools > Arduino COM3 (substitute Arduino COM3 with name you gave it in stage 3).
- Check the output of the command, ensure it flashed the memory successfully and enjoy a blinking LED!
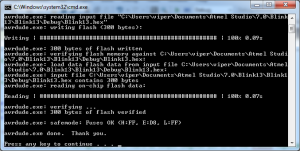
- If command has not finished running successfully, review the output and change you command parameters as required.

That concludes this mini tutorial. You should now be ready and set up to dive into C development for your Arduino board!

I am trying to set up Atmel Studio according to your tutorial, but no where can i find the external tools tab as per your tutorial. I am using Atmel Studio 7 (version 7.0.790). Please can you help?
LikeLike
Posted by Alex | 2016-05-07, 09:33Found the problem, i was using the standard interface and not the advanced interface, all sorted. thanks for the tutorial.
LikeLike
Posted by Alex | 2016-05-07, 10:57No worries, glad you figured it out. Happy programming :)
LikeLike
Posted by Mietek Rogala | 2016-05-07, 12:54will the bootloader be overwritten?
LikeLike
Posted by jokky | 2016-05-27, 12:03Hey man, nice tutorial.
I get the following error:
avrdude.exe: stk500v2_ReceiveMessage(): timeout
avrdude.exe: stk500v2_getsync(): timeout communicating with programmer
avrdude.exe done. Thank you.
My COM port is correct and my Arduino is a Mega 2560 too.
Here are my arguments:
-C”C:\Program Files (x86)\Arduino\hardware\tools\avr\etc\avrdude.conf” -patmega2560 -cwiring -P\\.\COM3 -b115200 -D -Uflash:w:”$(ProjectDir)Debug\$(TargetName).hex”:i
Do you have any idea what’s wrong?
Thanks and sorry for the long post and my bad english.
LikeLike
Posted by Matheus Narito ▼ (@Naarito) | 2016-05-30, 02:53Hi,
Please run Arduino IDE and have a look at its output window when it is trying to upload the hes file to the Arduino board. Mine was Nano, so the Atmega328p, but in case of yours atmega2560 should be Ok. I had the same issue and realize that followings has helped:
1-Changing -P from -P\\.\COM3 to just -PCOM3 (the former form is OK but always I prefer to use a simple one, unless it is necessary)
2- Changing -b from -b115200 to -b57600 has solved my problem. I know that we may adjust to use -b115200 from device manager, but I’d prefer to use the default to just make it work. I was not sure if my board support that seed or not.
3- Adding -carduino, Arduino IDE added this also to the command line arguments.
My “Arguments” is as follows:
-C”C:\Program Files (x86)\Arduino\hardware\tools\avr\etc\avrdude.conf” -v -patmega328p -cwiring -carduino -PCOM3 -b57600 -D -Uflash:w:”$(ProjectDir)Debug\$(TargetName).hex”:i
LikeLike
Posted by zonouzi | 2017-03-03, 16:10I realize this is an old comment, but I received the exact timeout error and I was able to upload by by changing -cwiring to -carduino. I turned on “Show verbose output during upload” in Arduino IDE > Preferences to show the full command that the Arduino IDE executes to upload. That’s also how I discovered -patmega328p for my Arduino Uno. Hope this helps future readers of this useful post.
LikeLike
Posted by Hari Wiguna | 2018-01-30, 16:38It may be better to omit -b (Baudrate) option for AVRDUDE utility. I assume there is an Automatic synch algorithm for the COM port in bootloader program as the same happens with PLATFORMIO too.
LikeLike
Posted by Murat Tokgozlu | 2022-11-29, 11:48Thank you so much for this really helpful guide!
LikeLike
Posted by Dennis | 2016-09-16, 17:50Hi, very excellent mini tutorial DIY (Do It Yourself)!!
But If you may help me with some config poitnts, I will be very glad. I think it could be some troubles that another C/C++ beginners could have too.
When I done all the steps you said, I see that you don’t say nothing about Arduino Mega version. It makes difference?
I can’t finish these steps with success, already.
I ‘m using Lseeduino, with a PL2303TA USB chip Interface, that is not a microcontroller. I’ve verify previously the Interface Manager (W7), and installed the Prolific USB_to_Serial COMM(16) driver, and its all OK.
http://www.prolific.com.tw/US/ShowProduct.aspx?p_id=153&pcid=41
My arguments line is:
“C:\Program Files (x86)\Arduino\hardware\arduino\avr\bootloaders\gemma\avrdude.conf” -patmega2560 -cwiring -P\\.\COM16 -b115200 -D -Uflash:w:”$(ProjectDir)Debug\$(TargetName).hex”:i
Congratulations for your mini tutorial, its excellent and very helpfull!!
LF
LikeLike
Posted by Luis Fernando F Bernabe | 2016-11-29, 12:32Thank you very much for helping me. i was struggling so many times to program mega using atmel studio 7.
LikeLike
Posted by selva | 2017-01-08, 13:53Worked perfectly – Thanks a lot
LikeLike
Posted by chute | 2017-02-17, 15:40HI As per se your Instruction.
It did not work well.
The code is compiled with no problem. But the program does not work properly
The bootloader must be changed for Atmel Studio, isnt it?
regards
Clement
LikeLike
Posted by Clement, Tsi Searn Yap | 2017-06-01, 09:28Thank you very much for tutorial. I have the following error message:
avrdude.exe: Device signature = 0x1e950f (probably m328p)
avrdude.exe: safemode: hfuse reads as 0
avrdude.exe: safemode: efuse reads as 0
avrdude.exe: reading input file “Debug\main.hex”
avrdude.exe: can’t open input file Debug\main.hex: No such file or directory
avrdude.exe: read from file ‘Debug\main.hex’ failed
Could you tell me what this means and how can i fix it? Thank you.
LikeLike
Posted by Cem | 2017-07-11, 20:48Thanks for the tutorial. There are several really good questions asked above. Would you be as kind to answer them? Especially the ones on Bootloaders and error message. Again, thanks!
LikeLike
Posted by Craig | 2017-12-28, 22:30Thanks! It is a great Work, also for sharing it!!
LikeLike
Posted by MiguelReyes | 2018-02-13, 19:23thanks, it work very well :)
LikeLike
Posted by Suho Kim | 2018-03-29, 08:12every once in a while, someone reaches out to pull the hand of another along the ‘way’, i recognize you as such, thank you……………………tk/ longtime zilog coder, just needed more uarts in my project {atmega2560)
LikeLike
Posted by timothy kodysh | 2020-05-13, 03:44