You may have encountered a scenario where TPM needs to be set to version 1.2 in order for encryption to work correctly (e.g. on Windows 7 platform). Many machines come with TPM 2.0 these days, however they still offer a backward-compatibility of running TPM 1.2 – quite often this is available as an option that can easily be changed in the BIOS. However, it is a bit different for a wide range of HP desktops and laptops. TPM can be switched between the two versions in a form of a firmware update. This article will walk you through steps you need to take in order to automate the process in SCCM Task Sequence.
HP tool – TPM Configuration Utility
First, let me quickly talk you through TPM Config utility:
- It has a limitation of carrying out TPM conversion only 64 times, but our Task Sequence will make sure TPM downgrade occurs only when needed.
- It comes as TPMConfig.exe and TPMConfig64.exe executables to be used on 32-bit and 64-bit platforms respectively.
- The firmware upgrade/downgrade image (BIN) files are to be used for conversion between specific versions. This is not only between TPM specification versions, but also HP’s internal TPM code versions.
- During the process the utility will create a hidden 5GB HP_Tools partition at the end of the drive (if it doesn’t exist already).
- The update process will take place upon reboot.
- When run in silent mode, the command doesn’t hold the handle, so a delay needs to be introduced to allow it to complete its tasks.
- You can point the executable to additional BIN file containing the BIOS password. BIN file stores the password in encrypted format and can be generated with HP Password Encryption Utility (HPQPswd.exe). If you specify password in your upgrade command, it will work if the BIOS password matches and if there is no BIOS password set, so: two birds, one stone.
Create SCCM Package with TPM Configuration Utility
Before you start tweaking your Task Sequence, you need to create a new package that will contain all required files. Download latest HP TPM Configuration Utility and place all files in the root of the directory. Also, include your BIN file with password (should you need one). Next, create a new SCCM Package and point it to your location. You do not need to create a Program, we need this container purely to hold the content. Below is an example of what your package should look like.

Example contents of TPM Configuration Utility package ready for use in SCCM Task Sequence.
TPM downgrade process on paper
Before we actually start putting steps into our Task Sequence, have a look at logic that will be applied. Below is a flowchart that shows you steps we will go through to achieve our goal, and also to protect integrity of the machine. We do not want to brick the device, now do we? We will run our TPM downgrade process only if:
- TPM downgrade is actually required (TPM is not running spec version 1.2)
- Machine model is supported by our tool (i.e. one that we tested on a sample machine)
- TPM chip manufacturer matches expected string

Flowchart depicting logic that will be implemented in the Task Sequence.
Create SCCM Task Sequence
Now that we know what we should be trying to achieve and we have created our Package with source files, let’s start the implementation! I think it will be easier to show you a final version of the Task Sequence, and then talk you through each one of the steps. For clarity, I have marked every step/group as follows:
- * denotes there is conditional execution (e.g. WMI query set in Options tab)
- > denotes the step is set to “Continue on error”
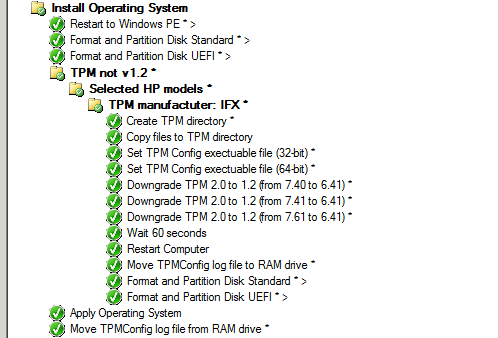
Final version of the Task Sequence steps used to convert TPM from version 2.0 to 1.2.
First of all, since this is OSD Task Sequence, we need to format our HDD. Pretty standard stuff, so no need to dive in deeper. Only thing to note is that the intended Windows partition drive letter has been assigned to OSDisk Task Sequence variable, it will be referenced and used later on.
After HDD is formatted, we start with establishing whether TPM downgrade is needed. We do it by querying Win32_TPM class and checking if SpecVersion does not start with 1.2% (make sure you make note of % wild card at the end of the string). Note the inverted logic in the IF statement.
Type: Group

Conditions:
If None of the conditions are true:
WMI Query (root\cimv2\Security\MicrosoftTPM): SELECT * FROM Win32_TPM WHERE SpecVersion LIKE "1.2%"
Next, assuming the above query was evaluated as true, we check if machine model this Task Sequence is running on matches one of the machines we have previously tested. I would strongly recommend to test this individually on every machine type you want to run it – don’t just include this for all machines that HP says its supported. You don’t want to mass-brick devices! We do it swiftly by querying value of Model property in Win32_ComputerSystem class.
Type: Group

Conditions:

If Any of the conditions are true
WMI Query (root\cimv2): SELECT * FROM Win32_ComputerSystem WHERE Model = "HP EliteDesk 705 G3 SFF"
WMI Query (root\cimv2): SELECT * FROM Win32_ComputerSystem WHERE Model = "HP EliteBook 725 G4"
WMI Query (root\cimv2): SELECT * FROM Win32_ComputerSystem WHERE Model = "HP EliteBook 745 G4"
We now need to evaluate whether TPM chip manufacturer is one of the expected ones. We are looking for IFX string, that is actually available under ManufacturerID property in Win32_TPM class as a decimal value. Cool!
Type: Group

Description: (1229346816 = 0x49465800 (ASCII: IFX))

Conditions:
If Any of the conditions are true
WMI Query (root\cimv2\Security\MicrosoftTPM): SELECT * FROM Win32_TPM WHERE ManufacturerId = "1229346816"
Assuming all above queries were true (we are not running TPM version 1.2, we are running this on one of the supported machines with supported TPM chip), we can finally get going. We start with creating a “TPM” folder on the primary partition (available under OSDisk variable).
Type: Run Command Line

Command line:
cmd.exe /c mkdir %OSDISK%\TPM

Conditions:
If None of the conditions are true:
Folder %OSDISK%\TPM exists
Next, we are going to copy all files (TPM utility, firmware files etc.) that we have previously created in our SCCM package to the local HDD (OSDisk). We do it simply using xcopy command – just make sure you select the Package tickbox and reference your package with source files!
Type: Run Command Line

Command line:
cmd.exe /c xcopy *.* %OSDISK%\TPM

Package: Selected "HP TPM Configuration Utility SP78910"
In next two steps, we set TPMCONFIGEXEC variable that will point to either TPMConfig.exe or TPMConfig64.exe, depending on version of WinPE (32-bit or 64-bit). Easily done by querying OSArchitecture property of Win32_OperatingSystem class.
Type: Set Task Sequence Variable

Task Sequence Variable: TPMCONFIGEXEC
Value: TPMConfig.exe

Conditions:
If Any the contitions are true
WMI Query (root\cimv2): Select * FROM Win32_OperatingSystem WHERE OSArchitecture = "32-bit"
Type: Set Task Sequence Variable

Task Sequence Variable: TPMCONFIGEXEC
Value: TPMConfig64.exe

Conditions:
If Any the contitions are true
WMI Query (root\cimv2): Select * FROM Win32_OperatingSystem WHERE OSArchitecture = "64-bit"
We finally get to run the executable to kick off TPM chip conversion process from TPM 2.0 to TPM 1.2! We do it by running one of the three steps, depending on the CURRENT HP firmware version. As mentioned before you need to apply the EXACT firmware update file from a specific TPM firmware version to another. We check current TPM firmware version by querying ManufactuterVersion property in Win32_TPM class. Then, we run TPMConfig(64).exe with silent switch (-s). We use -f switch to point it to the required firwamre file, -p to point it to file with encrypted BIOS password (if applicable) and -c switch to instruct it to create HP_Tools partition if necessary.
Type: Run Command Line

Command line:
cmd.exe /c %TPMCONFIGEXEC% -s -fTPM20_7.40.2098.0_to_TPM12_6.41.197.0.BIN -pBIOSpassword.bin -c

Conditions:
If Any of the conditions are true
WMI Query (root\cimv2\Security\MicrosoftTPM): SELECT * FROM Win32_TPM WHERE ManufacturerVersion = "7.40"
Type: Run Command Line

Command line:
cmd.exe /c %TPMCONFIGEXEC% -s -fTPM20_7.41.2375.0_to_TPM12_6.41.197.0.BIN -pBIOSpassword.bin -c

Conditions:
If Any of the conditions are true
WMI Query (root\cimv2\Security\MicrosoftTPM): SELECT * FROM Win32_TPM WHERE ManufacturerVersion = "7.41"
Type: Run Command Line

Command line:
cmd.exe /c %TPMCONFIGEXEC% -s -fTPM20_7.61.2785.0_to_TPM12_6.41.198.0.BIN -pBIOSpassword.bin -c

Conditions:
If Any of the conditions are true
WMI Query (root\cimv2\Security\MicrosoftTPM): SELECT * FROM Win32_TPM WHERE ManufacturerVersion = "7.61"
Since TPM Configuration Utility doesn’t wait for the process to finish and returns straight to command prompt after running, we need to give it enough time to complete the task before rebooting. I have used script described in one of my previous posts (How to control progress bar in MDT/SCCM Task Sequence using VBScript, but you can use any other method of introducing delay as you see fit. Either way – 60 seconds will do!
Type: Run Command Line

Description: TPMConfig.exe/TPMConfig64.exe does not hold the handle, give the tool enough time to create partition and stage firmware downgrade

Command line:
cscript.exe OSDwait.vbs /timeout:60

Package: Selected "OSD Wait 1.0"
At last, we can instruct machine to reboot and complete firmware update process. Just make sure you select to boot machine back to Windows PE! Important note: upon reboot you should see a prompt to press F1 to accept TPM reconfiguration or F2 to reject it.
Type: Restart computer

Specify what to run after restart:
The boot image assigned to this task sequence
Now the update process should be finished and we are back in Windows PE. Before we re-format the HDD (to get rid of HP_Tools partition we no longer need), it is a good idea to grab the update process log file and store it in RAM drive for future reference and potential troubleshooting. Bear in mind that the log file will have different name, depending whether it was 32-bit or 64-bit executable that created it. I move it to directory stored in %TEMP% system variable, which at this point should lead you to X:\Windows\Temp.
Type: Run Command Line

Description: Move TPMConfig.log/TPMConfig64.log file to Temp directory on RAM drive (should be X:\Windows\Temp)

Command line:
cmd.exe /c move /Y %OSDISK%\TPM\TPMConfig*.log %TEMP%

Conditions:
If Any of the conditions are true
File %OSDISK%\TPM\TPMConfig64.log exists
File %OSDISK%\TPM\TPMConfig.log exists
We can re-run our step to format and partition the HDD and that concludes our TPM update section.
Next, we deploy the WIM file onto the HDD – irrespectively of firmware update process. As a very last step, we add a nice touch of checking if our TPMConfig*.log file exists and if it does – we move it from RAM drive to local HDD for future reference.
Type: Run Command Line

Description: Move TPMConfig.log/TPMConfig64.log file from RAM drive to Logs directory

Command line:
cmd.exe /c move /Y %TEMP%\TPMConfig*.log %OSDISK%\Windows\Logs

Conditions:
If Any of the conditions are true
File %OSDISK%\TPM\TPMConfig64.log exists
File %OSDISK%\TPM\TPMConfig.log exists
Important thing to note: if the device comes with newer TPM firmware version (above 7.61), none of update steps will execute and the worst that can happen is just a reboot for no reason. While you will not have TPM downgraded to version 1.2, your device will also be automatically protected from accidentally bricking it! As newer version of firmware are released, you can update your package with source files and add relevant step for the update to take place in a controlled manner.
And that concludes the process of downgrading TPM chip to version 1.2 in SCCM Task Sequence on HP machines!
Happy converting!

Hello
I ran into a problem with the step “Downgrade TPM 2.0 to 1.2 (from 7.61 to 6.41)”… I got the errorcode 1 “incorrect function”.
Do you maybe know what the problem could be? I also tried to skip the steps create and copy TPM files. I the cmd line directly from the package.
Thanks and Regards
Marco
LikeLike
Posted by Marco | 2017-08-23, 07:05Hi Marco,
First and foremost make sure you have copied the desired .bin files to the same folder as TPMConfig(64).exe. The HP package will have these files in “Firmware” subdirectory, so you either have to move them or make sure your path to .bin file in your command includes the relative path. Also, please note there are no spaces between the switches and their values “-fTPM20_7.61.2785.0_to_TPM12_6.41.198.0.BIN”. I would also recommend to copy the files locally, as you never know if someone will try to re-use it in a future with Task Sequence set to run directly from Distribution Point (the utility will try to write the log file back to current directory.
Also try running the utility manually in WinPE (just the executable without any switches) and see if the GUI gives you more details on the nature of the issue.
LikeLike
Posted by Mietek Rogala | 2017-08-23, 07:18Thanks for the answer. I think the problem is at the “Copy files to TPM directory” step. If I check the log it’s copying some files from C:\, not sure why.
I did the “Run Command Line” like you described. The only difference is that I only got TPMconfig64.exe, the pw.bin and the fTPM20_7.61.2785.0_to_TPM12_6.41.198.0.BIN because I only need those files.
thanks
Marco
LikeLike
Posted by Marco | 2017-08-28, 06:36Hi there,
Any chance you can please post a walkthrough on how to do his on MDT?
Thanks a bunch!
LikeLike
Posted by Ro | 2018-02-16, 16:47Hi RO,
Unfortunately I am not planning to post a walkthrough of how to do it in MDT… I simply don’t have enough time to even post the stuff I am currently working on! However, I can offer a few words of advice…
There is no easy way to replicate this process in MDT, as MDT lacks the native functionality to reboot back into Windows PE. This can be achieved by manually pre-staging WinPE image and modifying boot record with BCDEdit, however you will then have to hard-code your further steps in WinPE’s start-up scripts as your Task Sequence will no longer drive the deployment (until you restart to full OS again)… It’s messy and not worth the effort. You’d be better off implementing TPM downgrade steps within your Task Sequence after you reboot into full OS.
LikeLike
Posted by Mietek Rogala | 2018-02-19, 14:38Can anyone confirm if they have managed to get this working in WinPE. I am running SCCM 1710 with MDT 8443 and I attempting to use this process to update the firmware. HP’s documentation states WinPE is not supported. The TPMConfig64.log file does not have any errors, however when the machine reboots to perform the update if fails immediately. I get the same message whether I try this process within PE or after the Windows 10 WIM file has been installed.
Any assistance would be appreciated.
LikeLike
Posted by spadge007 | 2018-07-13, 16:11I can confirm it did work for me in WinPE way-back-when. Even then HP docs said it is not supported in WinPE, but it did work. I have tested it in SCCM 2012 R2 and SCCM CB 1702 at the time.
LikeLike
Posted by Mietek Rogala | 2018-07-13, 16:57Thanks for the feedback. If I find a solution I’ll post it.
LikeLike
Posted by spadge007 | 2018-07-16, 09:21I exact same problem. Task Sequence fail with error TPMConfig64.exe is not recognised as an internal or external command.
LikeLike
Posted by Ian | 2018-07-19, 11:10That sounds like it is trying to call TPMConfig64.exe from incorrect location. Could you confirm if you can run the command manually in WinPE? If you can, it means there must be an error in logic or a spelling mistake somewhere. Also validate that 64-bit executable is called from within 64-bit PE image.
I no longer have access to that particular environment and hardware I have implemented it in, and time constrains won’t allow me to recreate it in my current lab. However, if the above troubleshooting fails, it would be worth playing with adding some WinPE components. My PE image definitely had WinPE-Scripting, WinPE-WMI, WinPE-HTA component installed, and potentially WinPE-NetFX.
LikeLike
Posted by Mietek Rogala | 2018-07-20, 08:24I’m wondering if it may be to do with how I’m partitioning the drive for UEFI .
GPT –
Volume 1
Primary
600MB
FAT32
Volume 2
Primary
100% remaining space
NTFS
LikeLike
Posted by Ian | 2018-07-20, 10:33That might be it… As you can see, my solution references %OSDISK% variable. I set this variable on my intended “C:” drive. In “Format and Partition Disk” Task Sequence step, select your volume 2 and click Partition Properties icon. From there, under Advanced Settings there should be just a single field called “Variable”. Enter OSDISK into that field, save it and re-run your Task Sequence. Repeat this for both Legacy and UEFI partitioning. Hopefully this is it!
LikeLike
Posted by Mietek Rogala | 2018-07-20, 10:46I have an error during the TS Sequence stating “error enumerating wmi instances returned from wql query invalid class” what could be wrong with the WMI query?
LikeLike
Posted by John | 2019-02-08, 11:49I would suspect either a typo somewhere in the query, or… make sure you have changed the Namespace that is being queried. By default the TS Editor will create the query against “root\cimv2” namespace, but in this case it should be “root\cimv2\Security\MicrosoftTPM”.
LikeLike
Posted by Mietek Rogala | 2019-02-08, 12:30Hi..
I’m still working on this, so I don’t have any working WMI for you – but in case it helps others…
I’m currently using this very helpful guide to patch the TPM for older 1.2 based PCs which we’re now looking at Bitlockering while imaging..
With HP’s TPM updates (from sp87753), there are sub-versions of the BIN files to upgrade..
EG 6.41 has 2 files:
TPM12_6.41.197.0_to_TPM12_6.43.245.0.BIN
TPM12_6.41.198.0_to_TPM12_6.43.245.0.BIN
Likewise for 6.43:
TPM12_6.43.243.0_to_TPM12_6.43.245.0.BIN
TPM12_6.43.244.0_to_TPM12_6.43.245.0.BIN
The ManufacturerVersion value just shows “6.41”.
However, if you look at ManufacturerVersionInfo, it looks like:
06-2b-00-f5-00-74-70-6d-73-30-38-ff-ff
(The “-” aren’t there – that’s just for clarity)
Which translates to:
06-43-00-245-00-116-112-109-115-48-56-255-255
So we can see that this has 6.43.245.
So you should be able to use WMI queries to get the exact version of your TPM from this.
LikeLike
Posted by Gerard Sweeney | 2020-01-28, 17:59In case it helps any.. Here’s the filenames and corresponding hex codes for the files in SP87753
(Here’s hoping this doesn’t get butchered in HTML)
1.2
TPM12_4.40.119.0_to_TPM12_4.43.257.0.BIN = SELECT * FROM Win32_TPM WHERE ManufacturerVersionInfo like ‘0428007700%’
TPM12_4.40.119.0_to_TPM20_5.62.3126.0.BIN = SELECT * FROM Win32_TPM WHERE ManufacturerVersionInfo like ‘0428007700%’
TPM12_4.42.132.0_to_TPM12_4.43.257.0.BIN = SELECT * FROM Win32_TPM WHERE ManufacturerVersionInfo like ‘042A008400%’
TPM12_4.42.132.0_to_TPM20_5.62.3126.0.BIN = SELECT * FROM Win32_TPM WHERE ManufacturerVersionInfo like ‘042A008400%’
TPM12_4.43.257.0_to_TPM20_5.62.3126.0.BIN = SELECT * FROM Win32_TPM WHERE ManufacturerVersionInfo like ‘042B000100%’
TPM12_6.40.190.0_to_TPM12_6.43.245.0.BIN = SELECT * FROM Win32_TPM WHERE ManufacturerVersionInfo like ‘062800BE00%’
TPM12_6.40.190.0_to_TPM20_7.63.3353.0.BIN = SELECT * FROM Win32_TPM WHERE ManufacturerVersionInfo like ‘062800BE00%’
TPM12_6.41.197.0_to_TPM12_6.43.245.0.BIN = SELECT * FROM Win32_TPM WHERE ManufacturerVersionInfo like ‘062900C500%’
TPM12_6.41.197.0_to_TPM20_7.63.3353.0.BIN = SELECT * FROM Win32_TPM WHERE ManufacturerVersionInfo like ‘062900C500%’
TPM12_6.41.198.0_to_TPM12_6.43.245.0.BIN = SELECT * FROM Win32_TPM WHERE ManufacturerVersionInfo like ‘062900C600%’
TPM12_6.41.198.0_to_TPM20_7.63.3353.0.BIN = SELECT * FROM Win32_TPM WHERE ManufacturerVersionInfo like ‘062900C600%’
TPM12_6.43.243.0_to_TPM12_6.43.245.0.BIN = SELECT * FROM Win32_TPM WHERE ManufacturerVersionInfo like ‘062B00F300%’
TPM12_6.43.243.0_to_TPM20_7.63.3353.0.BIN = SELECT * FROM Win32_TPM WHERE ManufacturerVersionInfo like ‘062B00F300%’
TPM12_6.43.244.0_to_TPM12_6.43.245.0.BIN = SELECT * FROM Win32_TPM WHERE ManufacturerVersionInfo like ‘062B00F400%’
TPM12_6.43.244.0_to_TPM20_7.63.3353.0.BIN = SELECT * FROM Win32_TPM WHERE ManufacturerVersionInfo like ‘062B00F400%’
TPM12_6.43.245.0_to_TPM20_7.63.3353.0.BIN = SELECT * FROM Win32_TPM WHERE ManufacturerVersionInfo like ‘062B00F500%’
2.0
TPM20_5.51.2098.0_to_TPM12_4.43.257.0.BIN = SELECT * FROM Win32_TPM WHERE ManufacturerVersionInfo like ‘0533003200%’
TPM20_5.51.2098.0_to_TPM20_5.62.3126.0.BIN = SELECT * FROM Win32_TPM WHERE ManufacturerVersionInfo like ‘0533003200%’
TPM20_5.60.2677.0_to_TPM12_4.43.257.0.BIN = SELECT * FROM Win32_TPM WHERE ManufacturerVersionInfo like ‘053C007500%’
TPM20_5.60.2677.0_to_TPM20_5.62.3126.0.BIN = SELECT * FROM Win32_TPM WHERE ManufacturerVersionInfo like ‘053C007500%’
TPM20_5.61.2785.0_to_TPM12_4.43.257.0.BIN = SELECT * FROM Win32_TPM WHERE ManufacturerVersionInfo like ‘053D00E100%’
TPM20_5.61.2785.0_to_TPM20_5.62.3126.0.BIN = SELECT * FROM Win32_TPM WHERE ManufacturerVersionInfo like ‘053D00E100%’
TPM20_5.61.2789.0_to_TPM12_4.43.257.0.BIN = SELECT * FROM Win32_TPM WHERE ManufacturerVersionInfo like ‘053D00E500%’
TPM20_5.61.2789.0_to_TPM20_5.62.3126.0.BIN = SELECT * FROM Win32_TPM WHERE ManufacturerVersionInfo like ‘053D00E500%’
TPM20_5.62.3126.0_to_TPM12_4.43.257.0.BIN = SELECT * FROM Win32_TPM WHERE ManufacturerVersionInfo like ‘053E003600%’
TPM20_7.40.2098.0_to_TPM12_6.43.245.0.BIN = SELECT * FROM Win32_TPM WHERE ManufacturerVersionInfo like ‘0728003200%’
TPM20_7.40.2098.0_to_TPM20_7.63.3353.0.BIN = SELECT * FROM Win32_TPM WHERE ManufacturerVersionInfo like ‘0728003200%’
TPM20_7.41.2375.0_to_TPM12_6.43.245.0.BIN = SELECT * FROM Win32_TPM WHERE ManufacturerVersionInfo like ‘0729004700%’
TPM20_7.41.2375.0_to_TPM20_7.63.3353.0.BIN = SELECT * FROM Win32_TPM WHERE ManufacturerVersionInfo like ‘0729004700%’
TPM20_7.60.2677.0_to_TPM12_6.43.245.0.BIN = SELECT * FROM Win32_TPM WHERE ManufacturerVersionInfo like ‘073C007500%’
TPM20_7.60.2677.0_to_TPM20_7.63.3353.0.BIN = SELECT * FROM Win32_TPM WHERE ManufacturerVersionInfo like ‘073C007500%’
TPM20_7.61.2785.0_to_TPM12_6.43.245.0.BIN = SELECT * FROM Win32_TPM WHERE ManufacturerVersionInfo like ‘073D00E100%’
TPM20_7.61.2785.0_to_TPM20_7.63.3353.0.BIN = SELECT * FROM Win32_TPM WHERE ManufacturerVersionInfo like ‘073D00E100%’
TPM20_7.62.3126.0_to_TPM12_6.43.245.0.BIN = SELECT * FROM Win32_TPM WHERE ManufacturerVersionInfo like ‘073E003600%’
TPM20_7.62.3126.0_to_TPM20_7.63.3353.0.BIN = SELECT * FROM Win32_TPM WHERE ManufacturerVersionInfo like ‘073E003600%’
TPM20_7.63.3144.0_to_TPM12_6.43.245.0.BIN = SELECT * FROM Win32_TPM WHERE ManufacturerVersionInfo like ‘073F004800%’
TPM20_7.63.3144.0_to_TPM20_7.63.3353.0.BIN = SELECT * FROM Win32_TPM WHERE ManufacturerVersionInfo like ‘073F004800%’
TPM20_7.63.3353.0_to_TPM12_6.43.245.0.BIN = SELECT * FROM Win32_TPM WHERE ManufacturerVersionInfo like ‘073F001900%’
LikeLike
Posted by Gerard Sweeney | 2020-01-29, 13:05